Monday 7 December 2009

Jayden and Laila

From a client shoot last week, SUCH adorable children, Laila had ants in her pants (and the cutest toes!) and Jayden would have happily posed all day! add to that an uber-yummy-mummy and you've got some fantabulous photos! ♥


Saturday 5 December 2009

calm before the storm

old-ish shot, from this summer :)

last rays of the sun over the beautiful lancashire countryside near my home, just before the heavens opened late one summers evening.

i entered this shot into the SWPP monthly competition and was pleased to get a Silver award :) dead hard to get gold, i've not managed it yet!

treasure


the theme for our photo project this week is 'treasure' and i decided, instead of thinking of treasure as a physical thing, something we possess, and more on the emotional aspect of it.

my baby son, ethan, takes his afternoon naps at home in our arms. it creates a couple of hours of peaceful solitude and closeness, but it wont be long before he stops doing it altogether. Here, on a quiet, overcast, sunday morning he was asleep on his daddy. i took several shots (2 of which can be seen in my gallery) but decided on this one-the emphasis being on his tiny little hand and the depth of field created by making this the focal point i.e. having his hand in focus and his face not.

i bleached the colours out slightly to create a more serene atmosphere, and decided not to do anything about the grain created by the high iso as i feel it adds something to the picture.

if i have to be brutally honest, thinking about this photo in such in-depth terms has made me feel quite sad :( hes a boisterous 15 month old now and i know how quickly these little moments disappear. I treasure them.

Wednesday 25 November 2009

Dead Mans Shoes

today we had to choose a film from a list and do a photograph influenced in any way by one of the films. we had knowledge of some of the films but others i had never seen. we googled some of them and found a film still from the film 'dead mans shoes' which i instantly connected with-anything with blood and gore and i'm a happy girl!

i called my best friend who had the day off work and convinced him to come meet us at huncoat power station in the suit he wore to my recent zombie wedding, we bombed it down the motorway, covered him in fake blood and used some of serena's left over paint for the walls.

i am very very pleased with how this image turned out, its very faithful to the original and we went to quite a lot of effort to get one image for a college photo challenge!

Our interpretation:


the original film still:

Tuesday 24 November 2009

Light Modifiers (systems and processes)

Part of our 'Systems and Processes' brief is to demonstrate what different light modifiers will do to an object being photographed. Each modifier has its own qualities and has a different effect on the item being photographed. I chose a red glass tea-light holder as i like the colour and the shape of it.

Honeycomb Grid


So-called due to the honeycomb-shaped structure, this fits over the front of the light to create directional light which fades into the dark, creating a dramatic, soft spotlight effect.


the basic set up, which shows the soft spotlight effect perfectly.


This is the final image. The glass is lit evenly with nice highlights but the image is slightly on the underexposed side. The light fades off to black gently and its very pleasing to the eye

Masked Softbox


Softboxes are light modifiers that create diffuse lighting. Good lighting definition and a soft shadow effect are the major advantages of softboxes. Inside the softbox there is a silver reflective coating, which distributes the light via reflection. The outer diffuser distributes the diffused light evenly.


The lighting set-up, showing the large amount of diffused light given by the softbox.


The final image. The light is pleasantly diffused all over the frame, with no noticable drop-off in light. The shadow thrown by the glass is soft and the image is pleasant to look at.


Beauty Dish
The Beauty Dish is a light modifier from the 1950s, which has recently been making a comeback. It distributes light towards a focal point and the result is a diffused but rather directional and unforgiving (in terms of photographing people) illumination.


The lighting set up, showing how the beauty dish disperses the light.


The final image. The light given off by the beauty dish is quite soft but not as soft as the softbox but the highlights on the glass from the dish are very distracting.

Umbrella


Umbrellas scatter the light from the flash over a wider area, making for very soft shadows and well diffused light. They can be translucent white, to shoot through, or silver-inset to bounce off. My set up was a silver-inset and you can see how that looks here:

the light is filling the entire of the picture, up to the diameter of the umbrella.


The final image, the shot is much darker than the others as the further diffusion of the umbrella means the light is spread over a greater area and therefore is not as concentrated on the glass item. But there is little shadow and the light is pleasing, illuminating all the glass evenly.

Out of the 4 final shots I personally prefer the honeycomb shot, as I like the spotlight effect, and the more dramatic feel the shot has overall. As for pure light quality, the softbox enhances the glass the best, but I find it to be a little boring!

lighting techniques (systems and processes)

Part of our 'Systems and Processes' brief is to show our knowledge of basic lighting techniques. There are 5 main types of light you can provide with one softbox, examples of which are shown below.

45/45 degree lighting
This is where the light source is placed at a 45 degree angle in front AND above the item being photographed.


The shadow and the catchlight on the apple show the position of the light, the lighting is soft and flattering, and because the light is coming from the left, the right side is slightly shadowed, giving the image more depth.

High Key
This technique is very popular and is very flattering for portraits. The overall image is high on light, usually with a white backgrounds, minimal shadows and even light all over the image.


The background on this is very white, and the light on the apple is bright, and ever-so-slightly overexposed. It doesnt really work so well on a coloured apple but high key works very well on portraits and its something i have used many times myself.

Low Key
This is where the tones over the image are dark and there are little highlights, its very often used in portrait work, usually on a black background.


you can see in this image that there are a lot of dark areas in this shot and only one light source, the image is pleasing and atmospheric.

Top Light
This is where the light source is placed directly above the subject, casting all the light downwards.


you can see the highlights placed on the apple are directly on the top, and the shadows are placed fairly evenly around the bottom. In a portrait, this would create some quite harsh shadows and, if done correctly, would make for quite a dramatic picture.

Backlight
This is when the light source is placed behind the subject, facing into the camera. This creates a silhouette of the subject which is very dramatic and effective if done correctly.


you can still see some detail in the apple, a hint of colour and skin texture, but mostly the apple is silhouetted. the light behind the apple is bright and it creates a very pleasing effect.

influential blogsites

Examples of blogs that i follow and read regularly include:

Postsecret -an ongoing community mail art project, in which people mail their secrets anonymously on one side of a homemade postcard. Select secrets are then posted on the PostSecret website, or used for PostSecret's books or museum exhibits. I find this blog to be a huge mixture of emotions and it makes me laugh and cry every week. Its also a great source of inspiration.

Baby as Art – some of the most beautiful and intimate baby photography i have ever come across, i find this site a constant source of inspiration and cant wait for the day i take a photograph anywhere near as beautiful as one from this site!

Offbeat Bride a blog all about the alternative, strange and sometimes wacky wedding celebrations, as a wedding photographer who specializes in alternative weddings i see a lot of inspiring work on this site.

What Would Tyler Duerden Do? – a celebrity gossip blog, i watch it for no other reason than it makes me laugh!

Lightroom Killer Tips – exactly what it says on the tin, a fabulous site with so many fantastic tips and tricks, i have learnt lots of useful things from this page.

Natalie Norton – a Hawaii-based portrait photographer, i watch her page to get inspiration and be very jealous over the beautiful quality of light Hawaii has, what a lucky lady!

macro photography

In this lesson, we were taught about various techniques for creating macro (or close-up) images.

a macro shot is defined as "...photography at 1x magnification and above. Anything less would be defined as "close-ups" rather than "macro". 1x magnification or life-size, is usually written as 1.1. Life-size means that the subject you are photographing appears the exact same size on film as it does in real life. Therefore if a fly is 15mm long, then the image of the fly on film will also be 15mm long." (http://www.shutterfreaks.com/Tips/tomhicksmacros.html)

there are several techniques you can use to create macro images, the first (and most obvious!) being a dedicated macro lens. These can be quite expensive though and there are other, cheaper, options available.
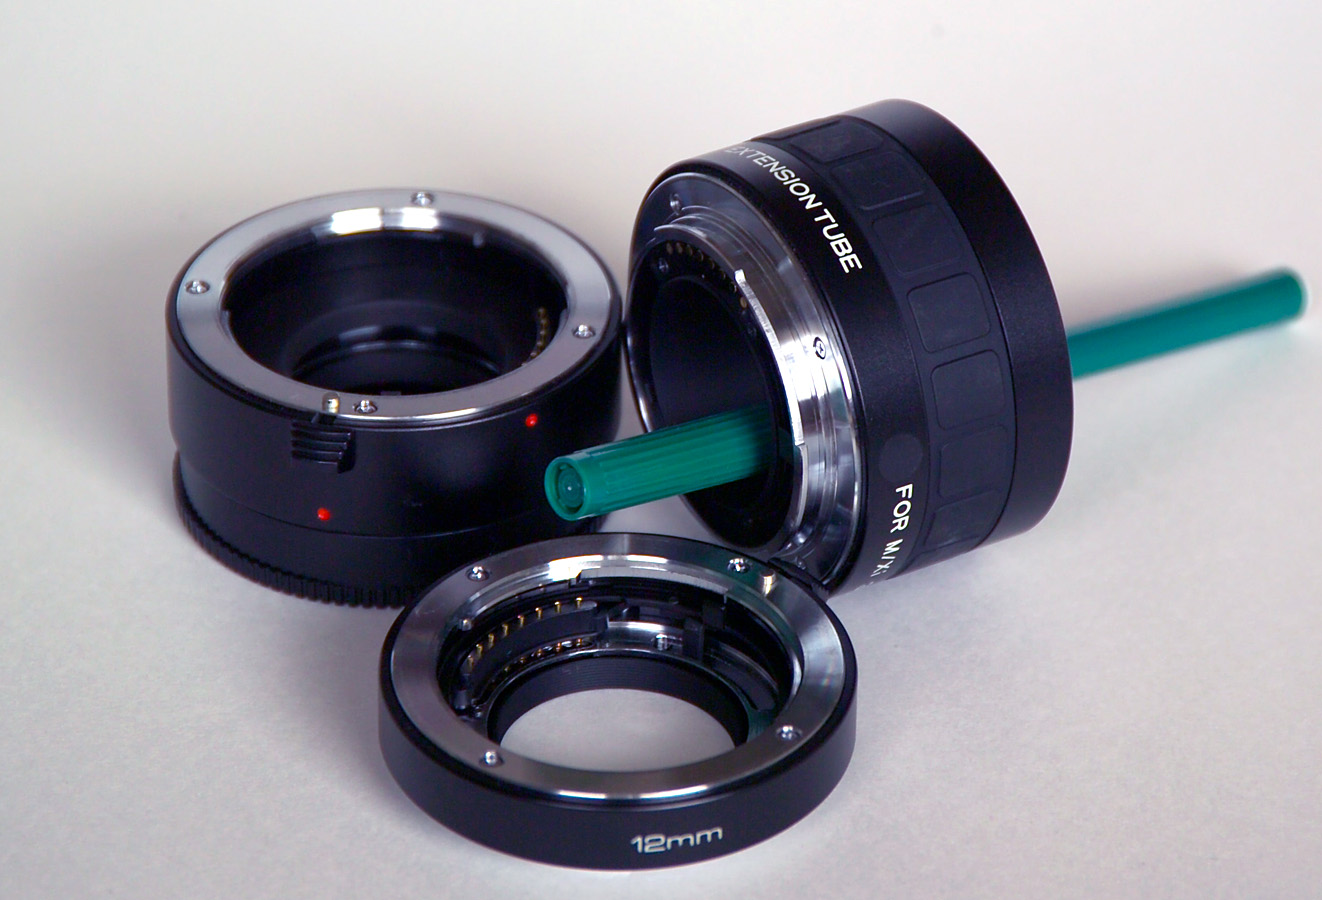

This is a set of extension tubes which are completely free of glass and attach to the camera's body directly, with the lens attaching to the tube. This increases the distance between the lens and the camera, thus increasing the magnification. The one major problem is that with each increase in distance, the more light is lost so if the subject is not well lit, it is nigh on impossible to get a decent shot without using a tripod.


This is a Macro Diopter which, unlike the extension tubes, screws directly onto the front of the cameras lens. This makes them very convenient and, because you can stack the different strengths up, quite powerful too. Because they are not increasing the distance between the lens and the camera, there is very little detraction of light so much better for natural-light shooting, but the extra glass on the front of your lens can degrade the image a little, especially if they are of inferior quality. But overall, they are a cheap and effective way of capturing macro shots, and were what i used on my camera til my recent dedicated lens purchase.

For Andrews class we were asked to photograph something small with a macro lens or one of the adapters above at different apertures to show the difference between the two-one at a small aperture (F11) and one with a large aperture (F2.8 on my lens)

being the gruesome type, i decided to photograph a dead fly :)

you can see on this shot that the depth of field is very very shallow, at only F2.8, with only a small portion of the fly being in focus. This is them main problem of using wide apertures for macro photography, which is why lighting is so important for macro work, so smaller apertures can be used to keep more of the object in focus.
(i also accidentally overexposed the image thanks to the wide aperture, hence the black line at the bottom from adjusting it in lightroom, i decided not to edit it out as i believe mistakes are a huge part of learning!)


this image was shot at F11, giving a much larger depth of field and therefore keeping much more of the fly in focus, its a lot more effective and definitely has more of an impact than the first photo. it was lit using 2 softbox strobes to counteract the smaller aperture. The details on this at 100% are fantastic, right down to the individual hairs on the flys body!

and some other shots taken on the day:


i love this one, it might be of a flys bottom but the shallow DOF works well on this one i think!

jewellery at F2.8

jewellery at F11.


I recently bought my first macro lens, a Tamron 90mm F2.8, and the difference in image quality compared to the screw-in adapters i was using previously is fantastically noticable!

english breakfast

For this fortnights photo challenge we were given the title of 'English Breakfast'

I decided that, instead of doing something quite typical-a full english or something food related-i would do something a bit more offbeat and literal.

I decided to concentrate on the word 'English' as opposed to 'Breakfast' and set about creating a stereotypical englishman, and, just because i like to be a bit silly from time to time, use my sister jen as the model. A shirt & tie (borrow from our dad!) waistcoat, mustache and monocle later, i had her sat behind a small table (shes actually sat on the floor in the shot!) eating Cornflakes and reading the times, a real ENGLISH breakfast :)

i used studio lights, one softbox to the right and one umbrella to the left and shot it at F8 and 1/125. I'm pleased with the results and it looks pretty much exactly as it did in my head, which is always a positive in my eyes!

firstly, some unedited, rejected shots:


and the final shot:

Individual Task-digital asset management.

We were given an individual assignment by John where we had to photograph an item under specific circumstances and camera settings.

  • Camera-set to manual focus, manual exposure, ISO 400 and shooting in RAW
  • Light-one of the following-Window, Strobe or Fluorescent
  • Importing-create a new catalogue, give each a custom name
  • Organising-add yourself as the creator for each file, rate pictures using the ***** method (5* for the best!) and sync the metadata
  • Editing-add a preset to your chosen photograph, check photo for colour and tonal accuracy
  • Exporting-create a folder for the photo to be exported to, JPG level 10 and give the file a new custom name, and choose for it to be opened in PS after export.


  • I decided to try and get a bit creative with this assignment and headed over to the Art block of the college and had a wander round. eventually, in the 3D art class i found some boxes up on the walls filled with bits and pieces, all sorts of things, wierd, wonderful and just odd. One of the boxes had a very small plastic doll in it, and because i had my new macro lens with me i decided to photograph that.

    below is the finished image, after doing all the above with it.


    the image is slightly dark as i was limited by ISO and the room i found it in was rather dark. It was lit by window light from above, and you can see the reflection of the roof windows in the eye of the doll. I used the widest aperture my lens was capable of (F2.8) to offset the darkness of the room but i had to sacrifice depth of field for that. Next time, i will take a tripod with me as a longer shutter speed would have solved that problem for me! I edited the photo using some of the basic presets in Lightroom (direct positive and sharpen-portraits) i didnt want to adjust the exposure or anything in lightroom as i wanted to show the doll pretty much as it was taken and not corrected too much.

    despite the darkness and slight shake due to the shutter speed (1/60 which was ever so slightly too slow for a handheld macro shot) i am pleased with how this turned out.

    below is a rejected image i wanted to post here, i rejected it as it was a bit too abstract for this project as i felt recognising the photo subject was important but i still quite like the shot! it was of a stick-on ribbon 'thing' for wrapping presents, love the colours and the bokeh.

    shutter speed (systems and processes)

    Shutter speed is one of the major aspects of photography, it is central to the creative process and getting it right can be the making of a fantastic photograph. We have been asked to give examples of our work to show our understanding of the effects of shutter speed.

    Example One


    The first image has a shutter speed of 0.3sec, making the model, who was walking towards the camera, blurry and indistinct. This works well on this photograph as it gives the image an ethereal, ghostly feel. I have since discovered that there is a local legend of the ghost of a white lady seen at this very spot!

    The 2nd image is taken at 1/60sec, not particularly quick but still quick enough to freeze the movement of the model. Even though it is a similar image in that the model is walking through the shot, she is sharp, her dress is frozen in the moment and it gives the shot an entirely different feel to the first photograph.

    Example 2


    The first image has a shutter speed of 2 seconds, showing my friend creating circles with a lightsabre, the definition and the sense of movement are only possible because of the long shutter speed.

    The 2nd image is taken at 1/50th of a second and, although the movement, position and conditions are exactly the same, the image is completely different, it has almost frozen the lightsabre half-way through the movement and shows nothing of the dynamics of the first image.

    Shutter speeds are a fantastic way of experimenting with light and movement to create different effects and are something that every photographer should understand.

    Wide and Telephoto Photographs (systems and processes)

    A wide angle is a lens that has a shorter focal length than normal, it will show more of a scene in the captured photograph. Telephoto is the exact opposite, it closes in on a subject, making it appear closer to the camera-it uses the glass in the lens to magnify the image

    I have shown an example of each below, each was taken with myself and the subject in the same position and they were taken within a few seconds of each other.


    The first image was taken at 35mm and you can clearly see the room behind the subject as well as her entire body.
    The second was taken at 105mm and this has filled the frame with the subjects face and torso, and is much more intimate than the previous frame. However, both photographs work well in their own right.

    drop focus (systems and processes)

    The drop focus technique is where, in an image, there is a narrow band of focus with the rest of the shot dropping out of focus. It creates a well-defined focal point for the photograph, drawing the eye to a specific area.

    I have used this technique myself many times in the past few years but i think this is one of my best examples.


    The focal point for this image isn't where you would expect it to be (on the blood droplet) but on the top lip, drawing the eye to the textures created on it, the shape of the lip and finally leading towards the bottom lip and the blood spilling from it. The narrow band of focus was achieved by using a macro lens on its widest aperture (F2.8) Its created a slightly abstract feel to the picture having the focal point placed where it is, to the point where many people have been unable to actually 'see' what it is, even with detailed description of the contents!